Windows Crackme 1
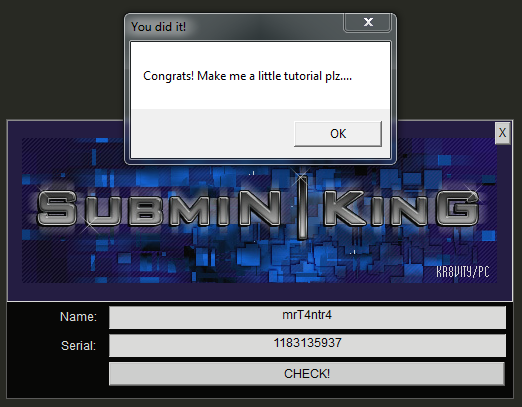
In this post we are going to crack a windows based crackme built using cpp.
It has been a while since I’ve done any reversing so I grabbed some crackmes from crackmes.one
There is no need of WinDbg(or any other debugger) to crack it as it is somewhat easy.
Also no need of pseudocode as the code can easily be reversed from the assembly.
And obviously it is unpacked.
So Now Let’s get this baby!!
Keygenme_Easy_1
by subminking
The crackme is levelled as easy and is a 1 point crackme but at the same time it acts as a good playground for learning assembly.
After firing up IDA, I straightaway opened the referenced strings view and found the Congratulations String
Going through the WinMain() function there is a call to DialogFunc() which is responsible for creating a dailogbox and getting the user inputs..
So we observe that all inputs are entered with the help of GetDlgItemTextA Function.
And further there is a call to sub_401040().
So sub_401040() begins with loading some memory from the data segment into the EAX register and then XORs it with ESP and storing that on the stack at ESP+190. Ok, leaving that for a while now!!
We see that the offset of the name we entered is moved into EAX and then it is perfectly loaded onto the EDX register.
Now the Game of Length comes into Play !!
It now computes the length of our Name and verifies if it is less or equal to 0x0A(Dec = 10)…
So we can enter our string accordingly…
I’ll be following the condition where it’s length is < 10.
You can also try the other one yourself.
Now there is a Jump to loc_4010DA.
And the name is stored in the stack.
Also now the EAX which contains our NAME is loaded.
And Now Basically the length is computed again and put into EAX.
Now the main serial generation process starts
The Various Steps are as follows:
The ESI register is given a value of 3.
The Value of ESI is put into EDX.
Then the location of NAME in the stack is assigned to EDI.
The value of EDX(ie. 3) is subtracted from EDI.
Now EDX Register holds the address of the location 3 bytes after name on stack.
The Value of EAX is now assigned to EBX.
And now the Control passes to loc_401120.
Now as [EDI+EDX] = [+ 3 Bytes - 3 Bytes] taking the starting location of NAME as a reference.
Therefore Name[i] is assigned to the EAX Register.
FYI, The ASCII Value of Name[i] is loaded into EAX.
Now ECX is loaded with a value of EDX + EAX.
Now there are some simple arithmetic operations which are included in the keygen which you can refer to the Opcodes and learn what is happening behind the scene… They are super easy!!!
There is also an operation of adding esi, ecx and 0x1341 and putting the result into esi.
At last after getting every Character’s ASCII Value from NAME and doing various operations with it, there is an AND Operation between ESI(result) and 0xDEADBEEF whose result is added to ESI itself.
And Later the Serial is checked with the value of ESI and Congratulations statement is printed on a Dialog.
Time for our Ultimate KeyGen !!!
I knew you were waiting for it.. weren’t you XD.
1 | name = list("mrT4ntr4") |
Run the above Python Keygen Script to get a working Serial for your NAME..
And AbraKaDabra!! Magic Trick Revealed By MrT4ntr4

There is a variety of crackmes on my checklist built with .NET, Java, Visual C++, etc..
I’ll be writing about some of my favorites among them in my upcoming writeups.
So Make sure to subscribe to the newsletter to learn together with me.
Also Comment your feedbacks and share this writeup with your friends.


